Many businesses have switched to Microsoft’s hosted service, Office 365, for email and other applications. Since most users are already used to using Microsoft Outlook client for Windows Systems, they will need to know how to configure the program to receive emails in Office 365.
The following steps will allow you to set up Exchange hosted email on Outlook 2010 or 2013:
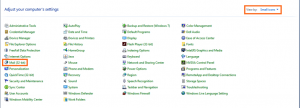
1. Click the Windows Start button, select Control Panel, and then click Mail (32-bit).
2. Click Show Profiles, click Add, enter a name for this profile, and then select OK.
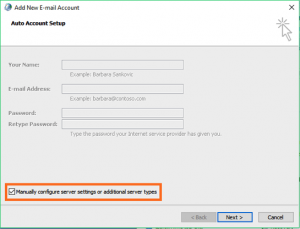
3. On the Auto Account Setup page of the Add New Account wizard, select manually configure server settings or additional server types, and then click Next.
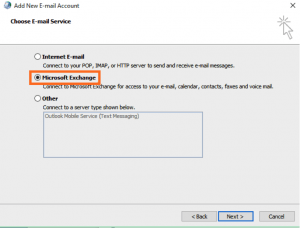
4. On the Choose E-mail Service page, select Microsoft Exchange, and then click Next.
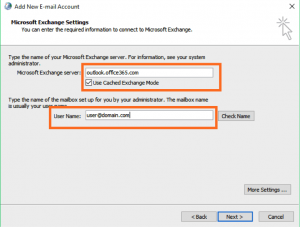
5. On the Server Settings page, perform the following actions:
A. In the Server text box, type outlook.office365.com
B. Select the Use Cached Exchange Mode check box.
C. In the User Name text box, enter the entire email address ([email protected])
D. Click More Settings.
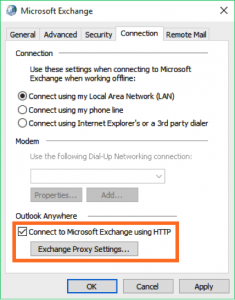
6. In the Microsoft Exchange dialog box, click the Connection tab and select the Connect to Microsoft Exchange using HTTP check box. Then, click Exchange Proxy Settings.
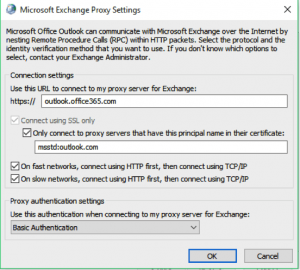
7. In the Microsoft Exchange Proxy Settings dialog box, perform the following actions:
A. In the Use this URL to connect to my proxy server for Exchange text box enter outlook.office365.com
B. msstd:outlook.com
C. Select both the On fast networks and On slow networks check boxes.
D. Under Proxy authentication settings, select Basic Authentication.
E. Click OK.
8. In the Microsoft Exchange dialog box, click Apply and then click OK.
9. On the Server Settings page, click Next.
10. Click Next, and on the next page, click Finish.
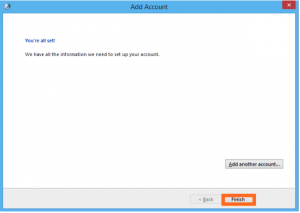 11. Open Outlook to select your new Exchange profile.
Voila! You should now be able to access your email via Outlook.
Have more questions? Get in touch and we can help.